Resizing Objects
Resizing objects using mouse
- Select Object.
- Position the cursor over one of the Object's handles.
- Press left mouse button.
- Hold the mouse button down, and then drag the cursor to the desired location in the Slide. Dotted frame, which is moving along with cursor, indicates new size of the Object's placeholder.
- Release the mouse button.
To interrupt resizing of the Object, press Esc key.
Resizing objects using keyboard
- Select desired Object.
- Hold down Shift key. Press the arrow keys to move right and bottom part of the Object's border.
The above mentioned methods can be also employed for resizing multiple Objects.
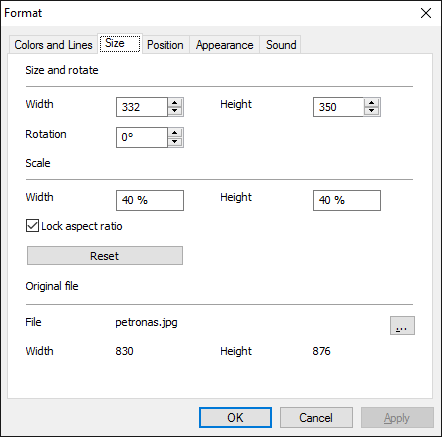
Precise resizing of the Object
- Select desired Object.
- Open Format dialog window. To do that press F3 key, or select option from Object's context menu, or press button in the group of the Main tab.
- Proceed to Size tab.
- Specify new values for the Width and the Height of the Object.
You can also use Format dialog window for resizing several selected Objects. When dialog window is opened, the Width and the Height fields will be populated with the sizing values, only if these values are identical for all the selected Objects. If you leave the field empty, corresponding dimension will remain unchanged for each Object.
command is also available from the Object's context menu in the Frame Structure section of the Tasks Panel.
When you insert the Object of any shape into the Frame it is placed into the Rectangular Placeholder. You can change size and orientation of this Rectangular Placeholder. There are 3 types of Objects allocation within the Rectangular Placeholder:
- Object that can automatically adjust it’s size to the size of Rectangular Placeholder (for example, pictures, and AutoShapes are always resizing it’s height and width to fit the Rectangular Placeholder),
- Object that can resize by itself (autofit to contents depending, for example, on the amount of the text)
- Object's size will not change

